


I love to save money by creating a treasure out of something I already have!
When hosting our recent party, we found ourselves without proper outdoor furniture. In order to solve this problem, we immediately hit the yard/estate sales and hunted down the tables and chairs needed to get the job done (see previous posts). However, they were lacking cushions for the seats.
In my business, Karen's Garden Cottage Antiques, I specialize in creating "Pieces of Dreams" hand painted furniture, "chic-tiqued" vintage pieces, and refurbished vintage wicker. Therefore, I am always coming across cushions and pillows that are clean, but in need of a face lift. Since I don't want to display my creations with forlorn seats, I find myself doing a lot of recovering to get the look I am trying to achieve. This time, I needed some cushions for our own furniture. And lucky for me, I had a large selection of cushions to choose from, along with beautiful bolts of coordinating fabric purchased at yard sales for 5 and 10 dollars each. (Especially the red and white-checky plaid!)
Below is a step-by-step of what I did and how I did it! (You can double click on my photos to get a better view)
 As you can see, I have a cushion that needs recovering. I made a pattern out of some old wrapping paper that I had handy. I placed the cushion onto the paper and traced around it, being sure to leave about 3/4 ths of an inch around to allow for the puffiness of the cushion, as well as the seam allowance. After I traced the pattern and cut it out, I folded the pattern piece in half and trimmed the pattern piece so that both sides would be even.
What you will need is one top piece and two pieces for the reverse side of the cushion. Please notice that when the two reverse side pieces are put together, they are larger in length than the top piece. I have allowed about 2 1/2 inches on each piece so that when they are put together, they overlap to form the pocket for putting the cushion into the cover. (You can see the overlap shown in the picture above.) I've carefully pinned the pattern pieces to the fabric and cut it out. (When I did this, I was working with the check/plaid material and lined up my pattern pieces on the fabric so that when sewn together, the fabric patterns would match up.)

Here is what one of the bottom pieces looks like. I am going to iron each bottom piece and prepare it for being sewn to the top cushion piece. (Once again, I have added 2 1/2 inches to the straight edge on the top of each of the bottom pieces.)

Because I want to get all my cutting and prep work done, I am hopping over to the ruffle preparation (if you choose to add one). The size of the ruffle is up to you. What I wanted was about a 2 inch ruffle, so I cut strips of material 4 1/4 inches wide. The length of the strip measures double for the area you to add the ruffle to. Here, I needed to put two strips together. ALWAYS IRON YOUR SEAMS OPEN!

After I put the two pieces together and ironed the seam, I have folded the ruffle strip in half and ironed it. My strip is done and ready for ruffling!
 I am back to the two reverse side pieces and I am turning the top edge under 1/4th inch once, ironing it, turning it under once again, and ironing it again.

I've chosen to use the zig-zag stitch to make a nice clean edge to the top of my two reverse side pieces.

The ruffle and reverse side pieces are prepped and ready to go!

 For this project, I am not ruffling all the way around the piece. I have marked off the area I want to add the ruffle to and am now pinning the ruffle onto the right side of the top piece of the cushion. Notice that the ruffle is facing IN. That is so when the whole thing is sewn together (right sides together) and turned right side out, the ruffle sticks out the proper way.

Because I want to get all my cutting and prep work done, I am hopping over to the ruffle preparation (if you choose to add one). The size of the ruffle is up to you. What I wanted was about a 2 inch ruffle, so I cut strips of material 4 1/4 inches wide. The length of the strip measures double for the area you to add the ruffle to. Here, I needed to put two strips together. ALWAYS IRON YOUR SEAMS OPEN!

After I put the two pieces together and ironed the seam, I have folded the ruffle strip in half and ironed it. My strip is done and ready for ruffling!
 I am back to the two reverse side pieces and I am turning the top edge under 1/4th inch once, ironing it, turning it under once again, and ironing it again.
I've chosen to use the zig-zag stitch to make a nice clean edge to the top of my two reverse side pieces.

The ruffle and reverse side pieces are prepped and ready to go!

I am at the machine and have it set on regular straight stitching. I fold and stitch as I go, creating "finger pleats" (I really like the look and process of this type of ruffling). If you have a ruffler on your machine, you may prefer that.
 For this project, I am not ruffling all the way around the piece. I have marked off the area I want to add the ruffle to and am now pinning the ruffle onto the right side of the top piece of the cushion. Notice that the ruffle is facing IN. That is so when the whole thing is sewn together (right sides together) and turned right side out, the ruffle sticks out the proper way.
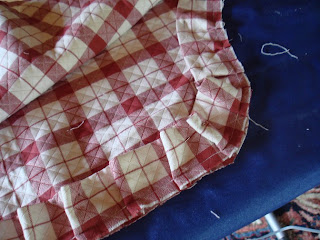
This is a close up of the completed pinning down of the ruffle.

The pinning of the finger pleating is complete and with right sides together, the piece is ready to be pinned together and sewn.

Once again, right sides together, with the two reverse side pieces overlapping, it's all pinned together and ready to be sewn!


The pinning of the finger pleating is complete and with right sides together, the piece is ready to be pinned together and sewn.

Once again, right sides together, with the two reverse side pieces overlapping, it's all pinned together and ready to be sewn!

I've sewn it together, turned it right side out and ironed it. It is done and ready for the cushion to be inserted into its new cover! Notice how the pocket pieces on the reverse side of the cushion overlap and the pattern matches up.


Peek-A-Boo! It's all put together and neatly covered with something fresh and new. I've gotten the custom look I want, using things I already have, and fabric I got for a song! What could be better than that?

So, not only did I make all the cushions for the outdoor furniture (you can see it all in my previous two posts), I also mixed and matched other coordinating fabric (Country Fair Check by Waverly) and made pillows and other cushion covers. I had a lot of that checky-plaid and sewed and sewed...

...and sewed!!!!
 We have a country sun porch in the old family farm house. Since there was fabric to spare, I made two styles of lined valances.

And, now that I have completed these projects and have gotten everything ready for summer and family visitors, I am back to work and painting. I will share some of those projects next!

So, not only did I make all the cushions for the outdoor furniture (you can see it all in my previous two posts), I also mixed and matched other coordinating fabric (Country Fair Check by Waverly) and made pillows and other cushion covers. I had a lot of that checky-plaid and sewed and sewed...

...and sewed!!!!
 We have a country sun porch in the old family farm house. Since there was fabric to spare, I made two styles of lined valances.
And, now that I have completed these projects and have gotten everything ready for summer and family visitors, I am back to work and painting. I will share some of those projects next!
Pieces of Dreams


Wow!! You are quite talented! Everything looks beautiful :) ♥
ReplyDeleteWhat a sweet cushion you made!! Your sunroom curtains are so cute!!
ReplyDelete